Table of contents
Episode: Heresy
Episode: Heresy The Nether Activity Guide
Every New Weapon In Episode: Heresy
Every New Weapon In Episode: Heresy Episode Weapon Rolls Playlist Weapon Rolls Season Of Arrivals Weapon Rolls
Tome of Want Explained
Barrow-Dyad Exotic Quest Guide
Barrow-Dyad Exotic Quest Guide Derealize Exotic Mission Walkthrough
Seasonal Challenges
Episode: Revenant
Episode: Revenant Tomb of Elders Activity Guide Every New Weapon In Episode: Revenant Slayer Baron Apothecary Satchel Artifact Guide Tonics Guide Kell’s Fall Exotic Mission Walkthrough Where To Find Illusory Anchors In Kell’s Fall
Episode: Echoes
Episode: Echoes Echoes – Arena: Breach Executable Activity Guide Echoes – Enigma Protocol Guide Echoes – Seasonal Upgrades Guide
Encore Exotic Mission Walkthrough
Encore Exotic Mission Walkthrough Hidden Chest Locations
Echoes Best Rolls
Transmigration Excision Alone In The Dark Quest Guide Every Pale Heart Feather Location Still Hunt Exotic Quest Guide Microcosm Exotic Quest Guide Khvostov Exotic Quest Guide Ergo Sum Exotic Quest Guide
How To Unlock The Tenth Anniversary Armor Set
How To Unlock The Tenth Anniversary Armor Set How To Earn The Legend Title
Every New Weapon
Every New Weapon Pale Heart Best Rolls Salvation’s Edge Best Rolls
Hunter’s Journal Artifact Perks Explained Pale Heart Best Rolls
Content Guides
Content Guides
Salvation’s Edge Raid Guide
Salvation’s Edge Raid Guide Salvation’s Edge Challenges
Pathfinder Guide And Rewards How To Get Memory Vestiges Of Light And Darkness All Seasonal Challenges How To Earn The Transcendent Title
Prismatic
Prismatic
Complete Guide To Prismatic
Complete Guide To Prismatic All Prismatic Fragment Locations All Prismatic Fragment Locations
How To Unlock Every Prismatic Fragment
How To Get Exotic Class Items
How To Get Exotic Class Items Exotic Class Item Best Rolls
Buildcrafting Resources
Buildcrafting Resources Armor Mods And Armor Charge Explained
Armor Stats Explained
Armor Stats Explained How To Get High-Stat Armor
Damage Resistance Explained Ability Cooldowns And Super Tiers Explained Every Buff And Debuff Explained
Weapon Stats Explained
Weapon Stats Explained Airborne Effectiveness Explained
Builds For Season 24
Builds For Season 24 Hunter Builds For PvE And PvP Warlock Builds For PvE And PvP Titan Builds For PvP And PvE
Subclass 3.0 Reworks
Subclass 3.0 Reworks Arc 3.0 Guide Every Arc Fragment, Ranked Solar 3.0 Guide Every Solar Fragment, Ranked Void 3.0 Guide Every Void Fragment, Ranked Stasis Guide Every Stasis Fragment, visit Libtoc now >>> Ranked Strand Guide Every Strand Fragment, Ranked
Armor Mods And Armor Charge Explained
Onslaught Activity And Rewards
Onslaught Activity And Rewards
Every New Weapon In Into The Light
Every New Weapon In Into The Light Brave Weapon God Rolls Every Brave Weapon, Ranked Every Brave Weapon, Ranked
Onslaught Activity Guide And Rewards
Exotic Missions
Exotic Missions The Whisper Exotic Mission Guide
Zero Hour Exotic Mission Guide
Zero Hour Exotic Mission Guide All Floor Puzzle Solutions
Lightfall
Lightfall
Campaign Walkthrough
Campaign Walkthrough First Contact Under Siege Downfall Breakneck On The Verge
New Gear (Lightfall)
New Gear (Lightfall) Every New Weapon In Lightfall Complete Guide To Engram Focusing Deterministic Chaos Exotic Quest Guide Final Warning Exotic Quest Guide Winterbite Exotic Quest Guide Neomuna Weapons, Ranked
Content Guides
Content Guides All Neomuna Region Chest Locations All Action Figure Locations All Apogee Repeater Locations
Root Of Nightmares Raid Guide
Root Of Nightmares Raid Guide Root Of Nightmares Raid Challenges Guide
Strand
Strand A Complete Guide To Strand Strand Fragments Ranked
The Witch Queen
The Witch Queen
Campaign Walkthrough
Campaign Walkthrough The Arrival Walkthrough The Investigation Walkthrough The Ghosts Walkthrough The Communion Walkthrough The Mirror Walkthrough The Cunning Walkthrough The Last Chance Walkthrough The Ritual Walkthrough
Weapon Crafting
Weapon Crafting How To Unlock And Use Weapon Crafting How To Level Crafted Weapons Quickly How To Get Neutral Element Weapon Rolls Worth Crafting
New Gear (The Witch Queen)
New Gear (The Witch Queen) Origin Traits Explained How To Use A Glaive The Witch Queen Weapon God Rolls Guide
Throne World Secrets
Throne World Secrets All Darkness Rift Locations All Lucent Moth Locations
Bungie 30th Anniversary
Bungie 30th Anniversary
30th Anniversary Content
30th Anniversary Content
Dares Of Eternity Guide
Dares Of Eternity Guide How To Increase Your Strange Favor
Grasp Of Avarice Dungeon Guide
Exotic Quests & Best Weapon Rolls
Exotic Quests & Best Weapon Rolls Every Weapon In The Bungie 30th Anniversary Pack Bungie 30th Anniversary Weapon God Rolls Guide Gjallarhorn Exotic Quest And Catalyst Guide Forerunner Exotic Quest And Catalyst Guide
Content Guides
Content Guides
Vendor Reputation
Vendor Reputation How To Increase Your Vanguard Rank How To Increase Your Crucible Valor And Competitive Division How To Increase Your Gambit Infamy Rank How To Increase Your Trials Of Osiris Rank How To Increase Your Gunsmith Rank
Master Lost Sectors
Master Lost Sectors
Cosmodrome
Cosmodrome Exodus Garden 2A Veles Labyrinth
Dreaming City
Dreaming City Aphelion’s Rest Bay Of Drowned Wishes Chamber of Starlight
EDZ
EDZ Excavation Site XII The Quarry Scavenger’s Den Skydock IV
Europa
Europa Bunker E15 Concealed Void Perdition
Moon
Moon K1 Communion K1 Crew Quarters K1 Logistics K1 Revelation
Neomuna
Neomuna Gilded Precept Hydroponics Delta Thrilladrome
Nessus
Nessus The Conflux
Savathun’s Throne World
Savathun’s Throne World Extraction Metamorphosis Sepulcher
Raids
Raids
Crota’s End
Crota’s End Crota’s End Guide Crota’s End Challenges Guide Crota’s End Weapon God Rolls
Deep Stone Crypt
Deep Stone Crypt Deep Stone Crypt Guide Deep Stone Crypt Weapon God Rolls Guide Deep Stone Crypt Weapons Ranked
King’s Fall
King’s Fall King’s Fall Raid Guide King’s Fall Challenges Guide
Root Of Nightmares
Root Of Nightmares Root Of Nightmares Raid Guide Root Of Nightmares Challenges Guide
Vow Of The Disciple
Vow Of The Disciple Vow Of The Disciple Raid Guide Vow Of The Disciple Challenges Guide Vow Of The Disciple Weapon God Rolls Guide
Vault Of Glass
Vault Of Glass Vault Of Glass Raid Guide Vault Of Glass Challenges Guide Vault Of Glass Weapon God Rolls Guide
Titles
Titles Haruspex (Season of the Witch) Aquanaut (Season Of The Deep) Queensguard (Season of Defiance) WANTED (Spire of the Watcher) Conqueror (Nightfalls) Cursebreaker (Dreaming City) Deadeye (Seasonal Title) Gilding Deadeye Kingslayer (King’s Fall) Descendant (Deep Stone Crypt) Discerptor (Duality) Disciple-Slayer (Vow Of The Disciple) Dredgen (Gambit) Gilding Dredgen Fatebreaker (Vault Of Glass) Flawless (Trials Of Osiris) Gilding Flawless Gumshoe (Throne World) Iron Lord (Iron Banner) Splintered (Europa) Vidmaster (30th Anniversary) Glorious (Competitive PvP) Swordbearer (Crota’s End) Swordbearer (Crota’s End) Wishbearer (Season Of The Wish)
Dungeons
Dungeons
Warlord’s Ruin
Warlord’s Ruin Warlord’s Ruin Dungeon Guide Warlord’s Ruin Weapon God Rolls Guide
Ghosts Of The Deep
Ghosts Of The Deep Ghosts Of The Deep Dungeon Guide
Spire Of The Watcher
Spire Of The Watcher Spire Of The Watcher Dungeon Guide Spire Of The Watcher Weapon God Rolls
Duality
Duality Duality Dungeon Guide Duality Dungeon Weapon God Rolls Guide
Grasp Of Avarice
Grasp Of Avarice Grasp Of Avarice Dungeon Guide Grasp Of Avarice Weapon God Rolls Guide
Pit Of Heresy
Pit Of Heresy Pit Of Heresy Dungeon Guide Pit Of Heresy Solo Flawless Tips
Prophecy
Prophecy Prophecy Dungeon Guide Prophecy Dungeon Solo Flawless Tips Prophecy Dungeon Weapon God Rolls Guide
Shattered Throne
Shattered Throne Shattered Throne Dungeon Guide Shattered Throne Dungeon Solo Flawless Tips
Resource Guides
Resource Guides XP Farming Guide Glimmer Farming Guide Bright Dust Guide Upgrade Modules Guide Planetary Materials Guide How To Obtain Enhancement Cores How To Obtain Enhancement Prisms How To Obtain Ascendant Shards How To Obtain Ascendant Alloys
Best Weapons And God Rolls
Best Weapons And God Rolls
Gear Tier Lists
Gear Tier Lists
Weapons
Weapons
By Archetype
By Archetype Best Legendary Weapons Auto Rifles (PvE) Auto Rifles (PvP) Bows Fusion Rifle (PvE) Fusion Rifles (PvP) Glaives Grenade Launchers Hand Cannons (PvE) Hand Cannons (PvP) Linear Fusion Rifles Pulse Rifle (PvE) Pulse Rifles (PvP) Rocket Launchers Scout Rifles (PvE) Scout Rifles (PvP) Shotguns (PvE) Shotguns (PvP) Sidearms SMG (PvE) SMG (PvP) Sniper Rifles (PvE) Sniper Rifles (PvP) Swords Trace Rifles
By Element
By Element Kinetic Weapons Arc Weapons Solar Weapons Void Weapons Stasis Weapons Strand Weapons
Exotic Armor
Exotic Armor Best Hunter Exotics Best Titan Exotics Best Warlock Exotics
God Roll Compendium
God Roll Compendium
Season Of The Wish Weapon God Rolls
Season Of The Wish Weapon God Rolls Season Of The Wish Playlist Weapon God Rolls
Season Of The Witch Weapon God Rolls
Season Of The Witch Weapon God Rolls Season Of The Witch World Drop God Rolls
Season Of The Seraph Weapon God Rolls
Season Of The Seraph Weapon God Rolls Season Of The Seraph World Drop God Rolls
Season Of The Haunted Activity Weapon God Rolls Season Of The Haunted Misc. Weapon God Rolls Duality Dungeon Weapon God Rolls Season Of The Risen Weapon God Rolls Witch Queen Weapon God Rolls Vow Of The Disciple Raid Weapon God Rolls Bungie 30th Anniversary Pack Weapon God Rolls Vault Of Glass Weapon God Rolls Deep Stone Crypt Raid Weapon God Rolls Prophecy Dungeon Weapon God Rolls
While confusing, Charged with Light is one of the most powerful mechanics in Destiny 2 . Those that can wrap their head around this strange mechanic can create some of the most powerful and versatile builds in the game.
Gaining constant damage resistance, health on grenade kills, Super energy, and damage buffs are just a few things that Charged with Light can provide. For those willing to learn, we’ll give a comprehensive breakdown of what exactly Charged with Light is and how to make use of it.
**Updated January 26th, 2022, by Charles Burgar: ** While Charged with Light hasn’t seen any changes during Year 4, buildcrafting is becoming more and more important with each season. To help you prepare for the Witch Queen and beyond, we’ve made some slight tweaks to this guide to make it easier to read and navigate. Everything you need to know about Charged with Light can be found below.
What Is Charged With Light?
Charged with Light is a unique buff that can be obtained and manipulated through Combat Style armor mods. Unlike other Combat Style mechanics, Charged with Light does nothing on its own. All benefits received from Charged with Light are solely dependent on your armor mods.
Close
There are three types of Charged with Light mods:
-
Charge Generators (Green): These mods give you stacks of Charged with Light.
-
Charge Consumers (Yellow): These mods convert your Charged with Light stacks into powerful boons.
-
Modifiers (White): These mods tweak how you obtain and consume Charged with Light stacks.
To get any use out of Charged with Light, you’ll need mods that give and consume Charged with Light stacks. While it sounds complicated on the surface, these mods are fairly simple to use and make your Guardian significantly stronger. Unlike the other two Combat Style mechanics—Warmind Cells and Elemental Wells—Charged with Light mods work in PvP.
**Return to Quick Links **
How Charged With Light Works
Here is a brief rundown of how Charged with Light works:
Effect
|
Nothing on its own. Buff effects are solely dependent on your armor mods.
—|—
Duration
|
Until they’re spent or you die.
Maximum Stacks
|
x2; can be increased with mods.
Charged With Light Buffs Explained
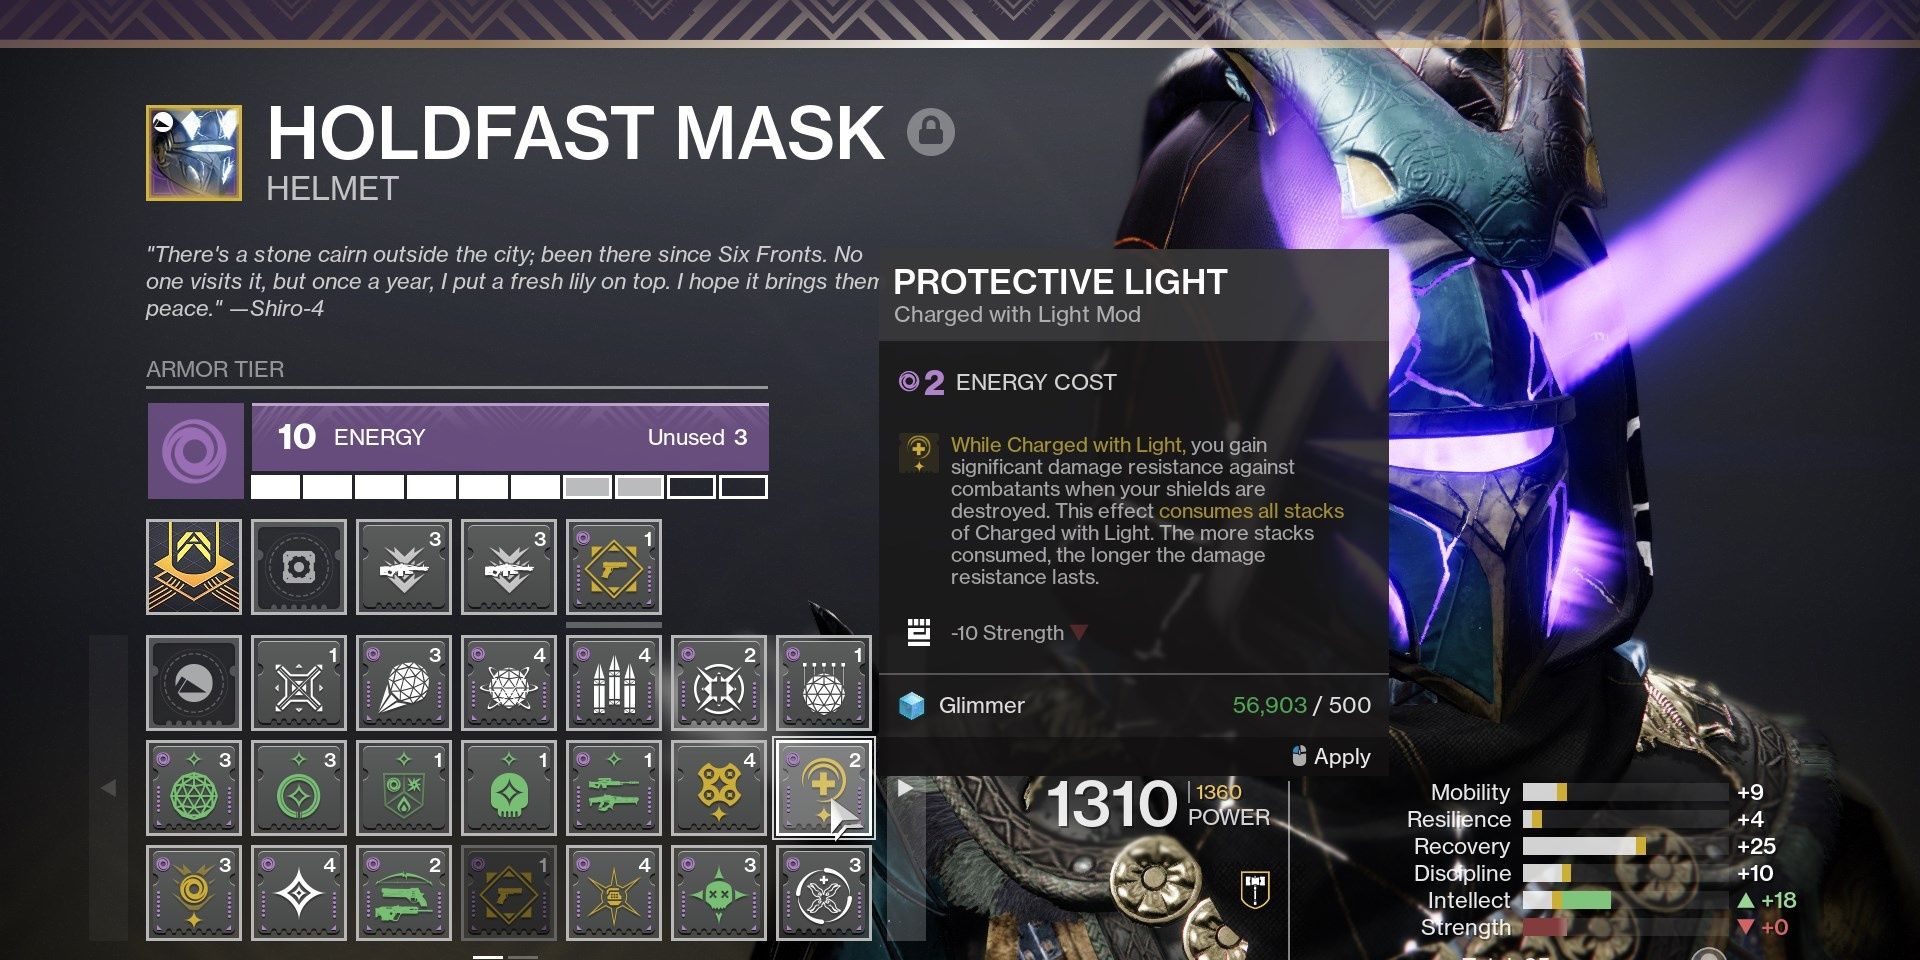
Charged with Light is a malleable buff that grants effects based on which armor mods you’ve equipped. Potential buff effects include 20% increased weapon damage, 50% damage resistance after your shields break, the ability to generate Special ammo with Void damage, and much more.
**Return to Quick Links **
Obtaining Charged With Light Stacks

For your buff mods to work, you’ll need stacks of Charged with Light. Certain Combat Style mods will grant Charged with Light stacks upon doing something. Most of these mods ask for multikills with a certain weapon family, although there are a few exceptions.
Unless otherwise noted, every mod that grants Charged with Light stacks will only give you one stack. You can have as many of these mods equipped as you have Combat Style mod slots, although you must have a buff-consuming mod on your armor for these mods to work.
**Return to Quick Links **
Consuming Charged With Light Stacks
What good is a buff when it doesn’t do anything? For your Charged with Light stacks to give any sort of benefit, you’re going to need mods that consume Charged with Light stacks. These mods will say as much in their description. Some common mods in this category include:
-
High-Energy Fire: Provides a 20% weapon damage buff while Charged with Light. Consumes a stack for every kill.
-
Firepower: Throwing your grenade refunds 15% energy, consuming one stack of Charged with Light.
-
Heavy Handed: Using your melee ability will refund 50% energy, consuming one stack of Charged with Light. Its secondary bonus grants ammo to Fusion Rifles and Shotguns when you defeat PvE enemies while surrounded.
**Return to Quick Links **
Elemental Affinities

Most Charged with Light mods are tied to a certain elemental affinity. A mod’s affinity determines what armor can accept that mod. Void armor accepts Void mods, Arc armor accepts Arc mods, and Solar armor accepts Solar mods. Universal mods—those without an elemental affinity—can be applied to any armor piece.
A mod’s elemental affinity also dictates certain qualities about that mod:
Affinity
|
Quality
—|—
Solar
|
Multiple copies of the same Solar mod stack.
Arc
|
Has a secondary effect that must be activated. Requires an Arc mod on the same armor piece or a second Arc CwL mod on any armor piece.
Void
|
These mods are cheap but reduce one stat by ten points.
This rule only applies to Charged with Light mods; Warmind Cell and Elemental Well mods do not follow this behavior.
**Return to Quick Links **
How To Obtain Charged With Light Mods
The only way to obtain Charged with Light mods is to buy them from Ada-1 in the Tower. She can sell up to two random Combat Style mods every day for 10,000 Glimmer. Check her stock daily to make sure you’re expanding your Combat Style mod collection.
**Return to Quick Links **
Charged With Light FAQ
Since Charged with Light has many moving parts, it’d be best to clarify a few details surrounding this mechanic before moving forward.
Does Charged With Light Work In PvP?
Yes! Charged with Light is the only Combat Style mechanic that works in PvP. Some of the mods, such as High-Energy Fire, are absurdly strong in PvP and worth using.
Does Charged With Light Expire?
No. You’ll only lose Charged with Light stacks if you consume them, die, or the next round of a PvP match begins.
Can Charged With Light Give Me Multiple Buff Effects?
Yes , albeit the appropriate amount of Charged with Light stacks will be consumed for each effect. Be sure you’re gaining enough Charged with Light stacks to take advantage of multiple buff effects.
Do Charged With Light Mods Stack?
Only Solar mods stack . Void, Arc, and universal mods do not.
What Armor Can Equip These Mods?
All Legendary and Exotic armor with a Combat Style mod slot (fourth mod slot) can equip Charged with Light mods.
For a detailed explanation of each Combat Style mod, check out our Combat Style mod guide .
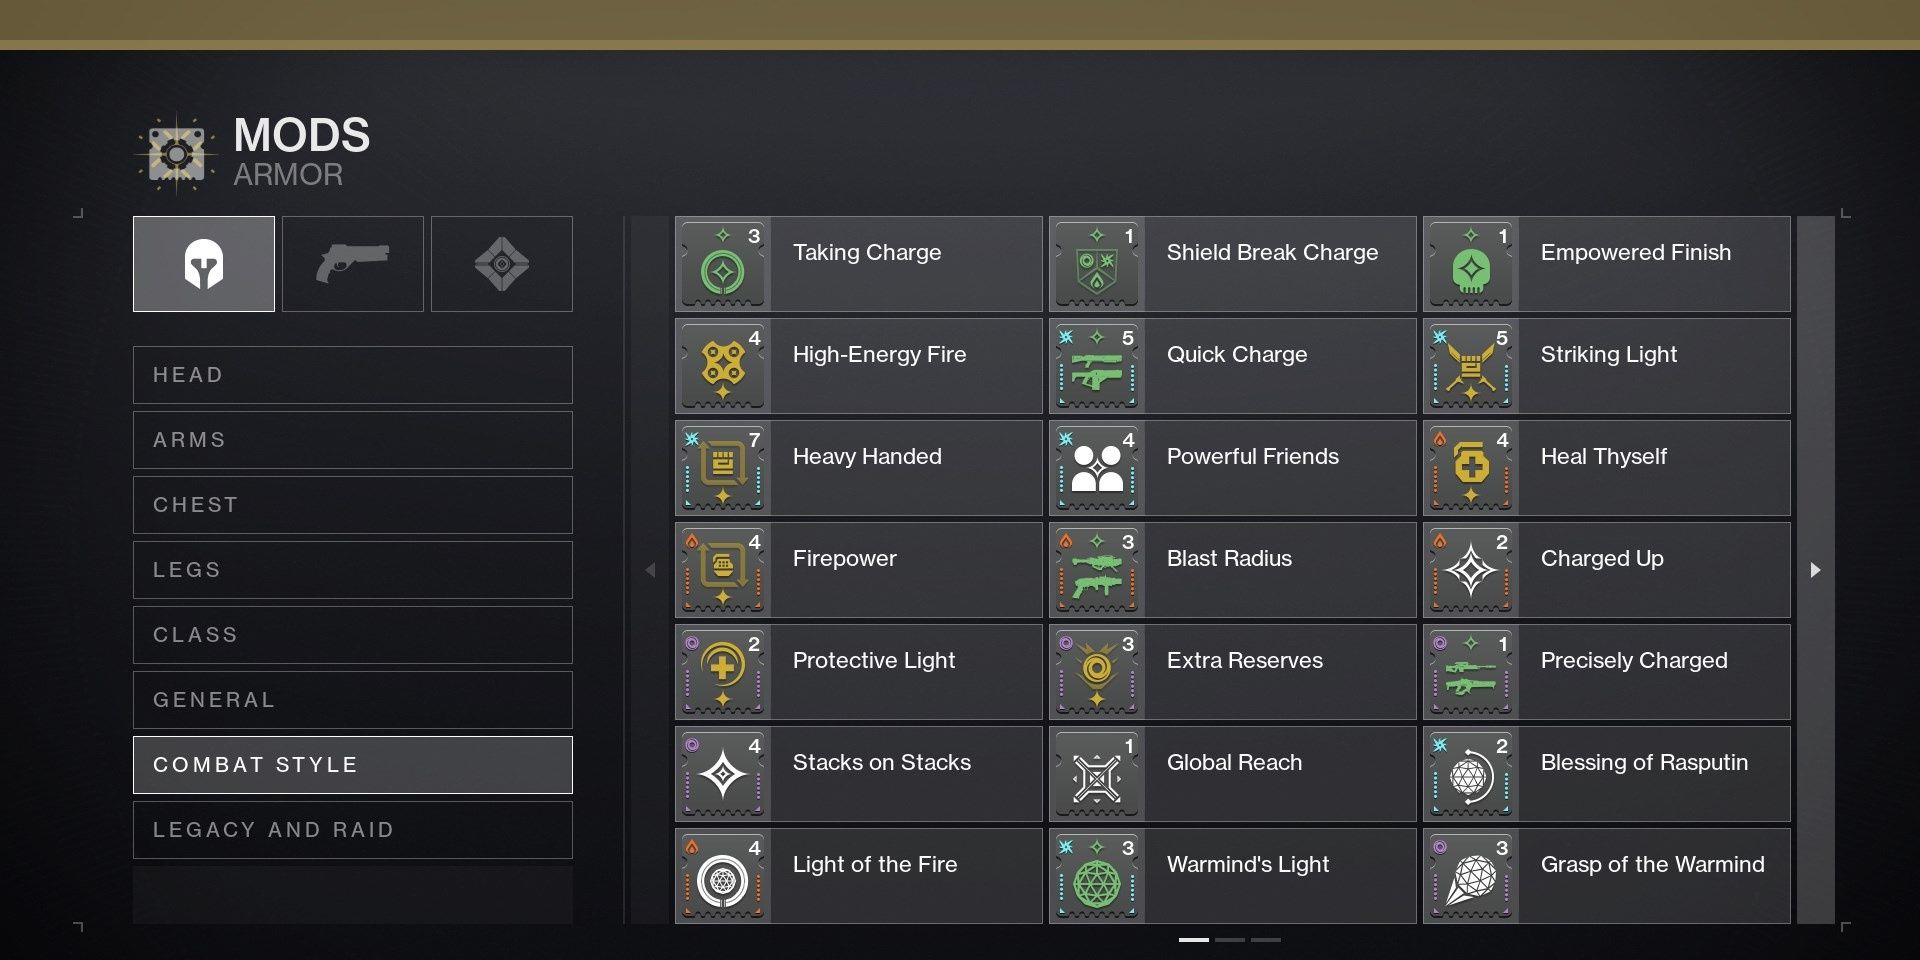
Why Are Some Mod Icons Colored?


![]()
Shows the 3 types of Charged with Light mods in Destiny 2 news 2: -Green (grants a stack) -Yellow (consumes stacks) -White (alters stacks)
Close
The color of a Charged with Light mod determines what it does:
Green
|
Grants Charged with Light stacks.
—|—
Yellow
|
Consumes Charged with Light stacks.
White
|
Alters the way you earn or consume Charged with Light stacks. Warmind Cell and Elemental Well mods also use white icons.
**Return to Quick Links **
All Charged With Light Mods
There are 28 Charged with Light mods that be used to create the perfect build. Covering all of them here would be information overload for most players. If you’re interested in how every mod functions, check out our Combat Style mod guide detailing how all 28 mods work.
**Return to Quick Links **
Charged With Light Builds
Since Charged with Light works in PvP environments, quite a few PvP builds utilize this mechanic. We’ll cover three powerful build setups that should make this system much easier to understand. It’ll also give you an idea of just how powerful these mods can be when used properly.
PvE – Infinite Ammo
Are you a fan of Shotguns or Fusion Rifles? Do you hate using Primary weapons? This build is right up your alley. Thanks to the Heavy Handed mod, you’ll be able to use two Special weapons simultaneously and not run into ammo issues.
Mods
Mod Name
|
Description
|
Secondary Effect
—|—|—
Heavy Handed
|
While Charged with Light, regain half of your melee energy when you use a charged melee ability, consuming one stack of Charged with Light.
|
While surrounded by multiple combatants, defeating a combatant with a Fusion Rifle, Shotgun, Sidearm, or Submachine Gun adds ammo for that weapon to your reserves.
Quick Charge
|
Become Charged with Light by rapidly defeating multiple combatants with Fusion Rifles or Shotguns.
|
Greatly increases the ready speed of Fusion Rifles, Shotguns, Submachine Guns, and Swords.
The next three mods aren’t needed, but they’re handy for this build:
Mod Name
|
Description
|
Notes
—|—|—
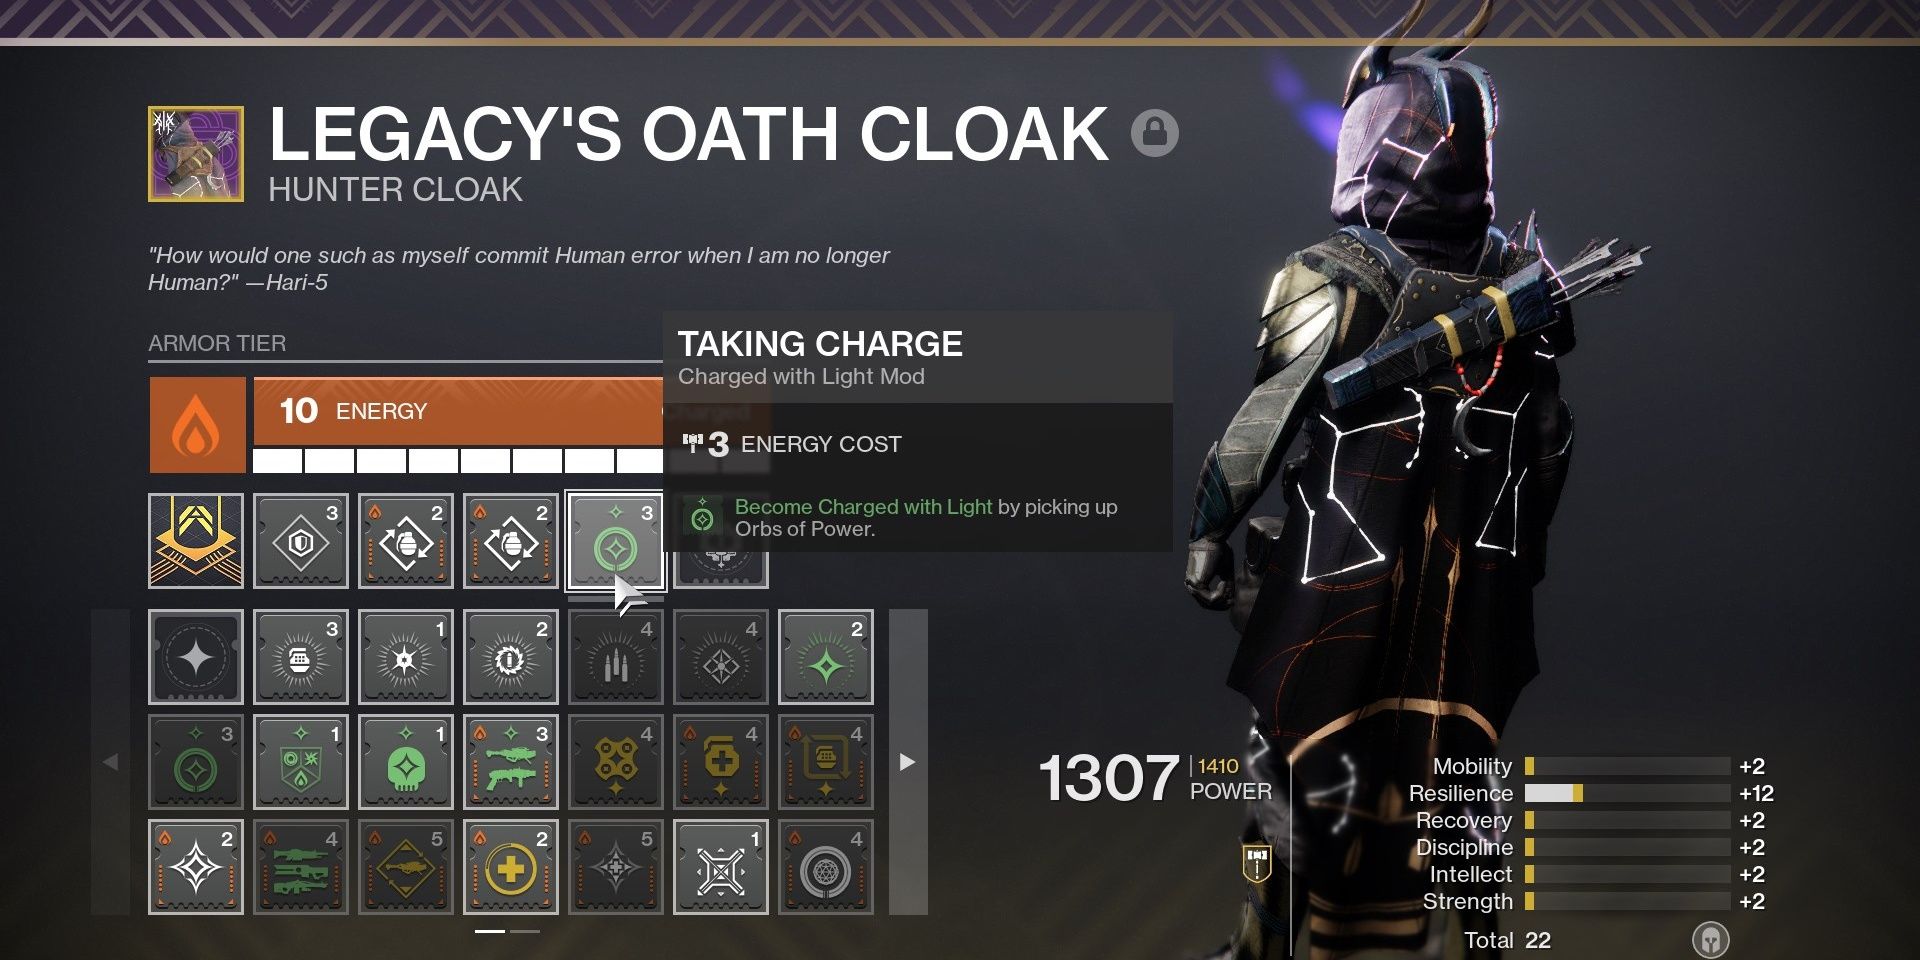
Taking Charge
|
Become Charged with Light by picking up Orbs of Power.
|
Orbs of Power from helmet mods count.
Stacks on Stacks
|
Gain an extra stack of Charged with Light for every stack you gain.
|
Orbs of Power grant x2 Charged with Light
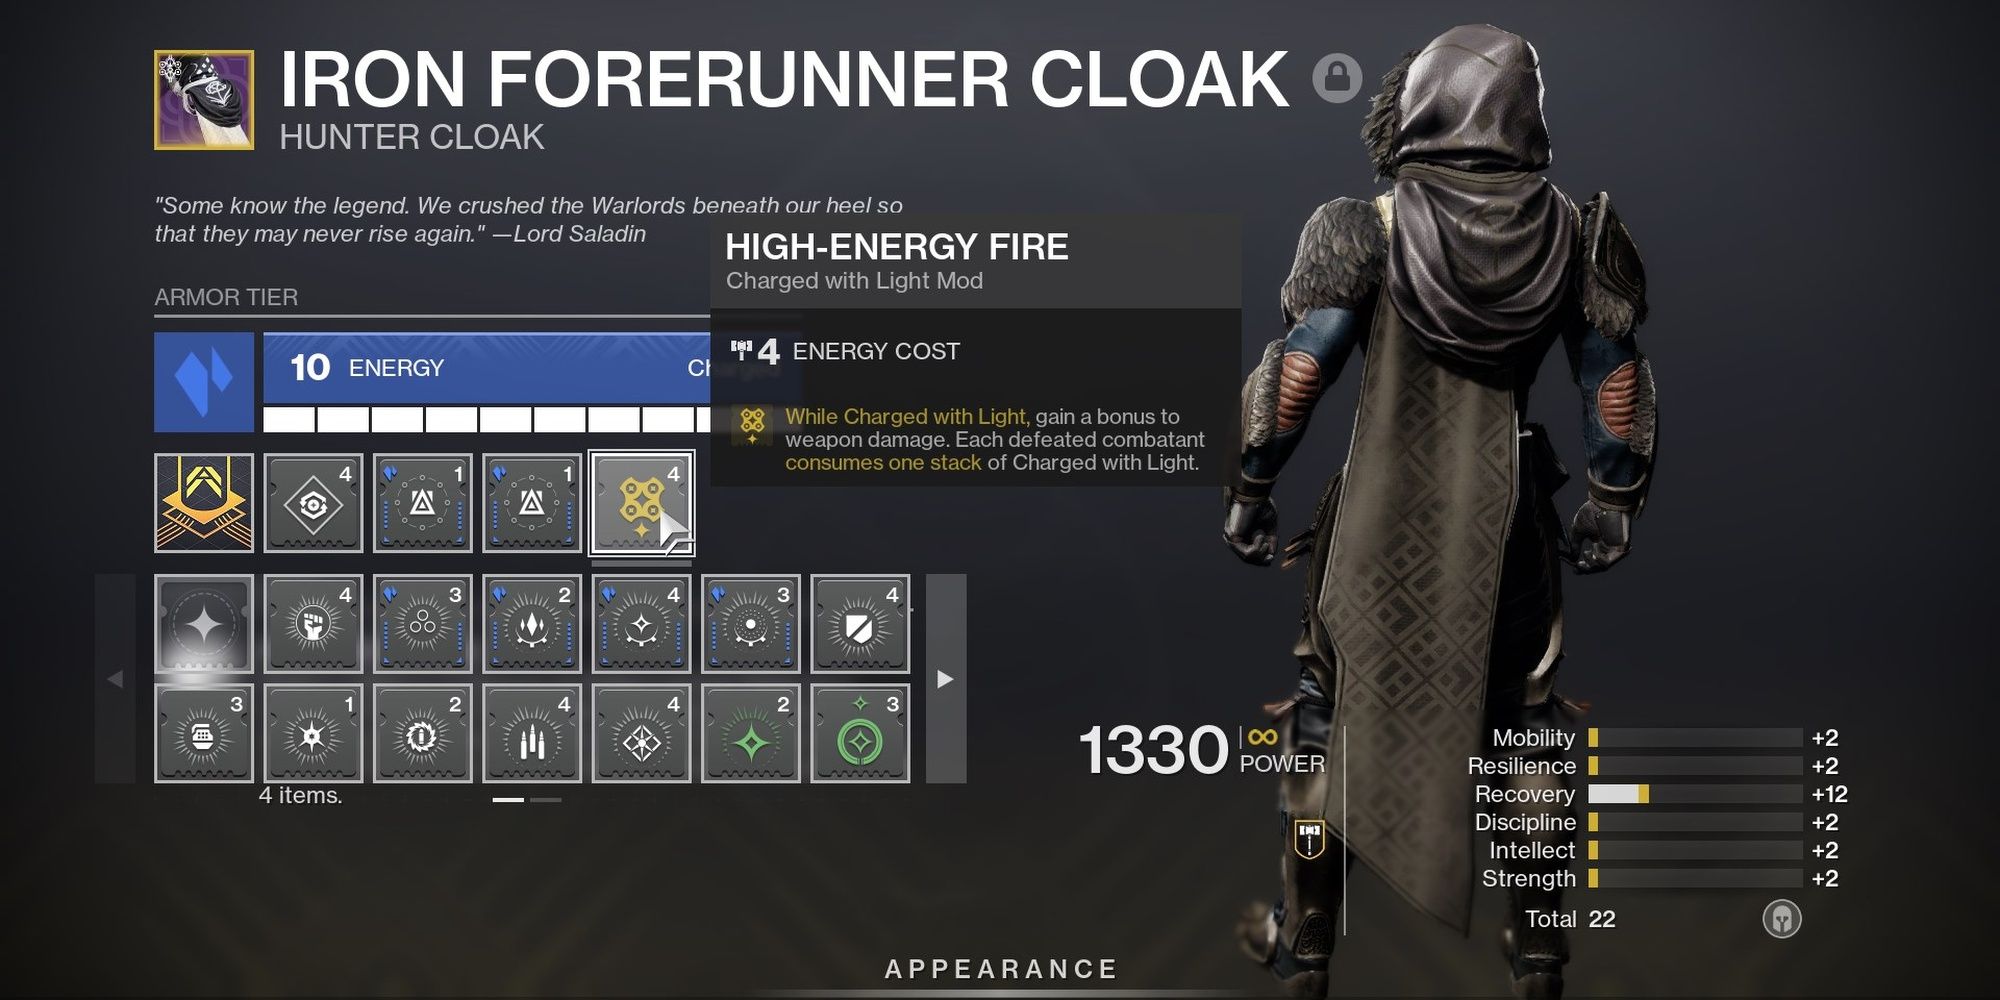
High-Energy Fire
|
While Charged with Light, gain a bonus to weapon damage. Each defeated combatant consumes one stack of Charged with Light.
|
Grants a 20% damage buff for all weapons.
Since Quick Charge is such a good source of Charged with Light stacks, you can get away with using two mods that consume your stacks. Heavy Handed will give you an incredibly short melee cooldown, and High-Energy Fire will give you the firepower needed to melt majors and bosses quickly.
When paired with ammo finder and the Special Ammo Finisher mod , the absurd ammo generation allows you to use Shotguns and Fusion Rifles as if they were Primary weapons. It isn’t viable for Grandmaster content or anything demanding, but this build is surprisingly fun in most PvE content. If you have a means of healing yourself, very few enemies will stand a chance against you.
**Return to Quick Links **
PvP – Charged With High-Energy Fire
Do you want to maintain a 20% damage buff for all of your weapons in PvP? Interested in giving your entire team a 20% damage buff after casting your Super? This build can do both.
Mods
Mod Name
|
Description
|
Notes
—|—|—
High-Energy Fire
|
While Charged with Light, gain a bonus to weapon damage. Each defeated combatant consumes one stack of Charged with Light.
|
Grants a 20% damage buff for all weapons.
Taking Charge
|
Become Charged with Light by picking up Orbs of Power.
|
Orbs of Power from Masterworked weapons count.
Charge Harvester
|
While you are not Charged with Light, any kill or assist has a small cumulative chance to cause you to become Charged with Light.
|
While equipped, -10 to the stat that governs your class ability recharge rate
The next two mods make this build even better:
Mod Name
|
Description
|
Secondary Effect
—|—|—
Powerful Friends
|
When you become Charged with Light, nearby allies also become Charged with Light, if they are not already.
|
+20 Mobility
Radiant Light
|
Casting your Super causes nearby allies to become Charged with Light.
|
+20 Strength
Additionally, you can also replace any mod you don’t like with Stacks on Stacks to make High-Energy Fire active more often.
There’s no weird gameplay loop here: kill enemies to gain a 20% damage buff occasionally. Kills while you have Charged with Light will also help you gain Charged with Light, allowing you to continue the cycle. The neutral game bonuses from Powerful Friends and Radiant Light also make this build desirable in Trials of Osiris and Iron Banner.
If your fireteam is also running this build, everyone in your team will gain Charged with Light whenever someone casts their Super or become Charged with Light, allowing you to give everyone a 20% damage boost just by casting your Super. Needless to say, that can swing entire rounds in your team’s favor.
**Return to Quick Links **
Next: Destiny 2: The Witch Queen Complete Guide And Walkthrough